

If you are looking for a GPU-mineable digital currency, then Grin Coin may be interesting to you. As a result of its attractive features and low barriers to entry with regards to participating as a miner, many members of the cryptocurrency community have expressed excitement about “GRINning”.
In this guide, you will discover a step-by-step guide on how to mine Grin Coin in 2019.
A Grin Coin Introduction
 Launched on January 15, 2019, privacy-centric project Grin has piqued the interest of the cryptocurrency community. The newcomer is noted for being the second implementation of the privacy and scalability-focused Mimblewimble technology.
Published online by a pseudonymous inventor named Jedusor, Mimblewimble is an innovative blockchain implementation which supports a high level of privacy through its software. Users can obscure all details pertaining to the transactions and files sent over the network.
Additionally, Mimblewimble is designed for scalability. The blockchain only requires ten percent of its data to effectively function. The network deletes the rest of its data on a regular basis. As a result, the Mimblewimble blockchain is said to be infinitely scalable.
Due to its underlying Mimblewimble software, Grin is private and scalable. It also features additional features that serve to further endear it to the cryptocurrency community. These stem from its consensus and governance mechanism. Its Proof-of-Work (PoW) algorithm allows the coin to be GPU minable. Additionally, the network’s developers have prioritized ASIC resistance, hard coding a hard fork every six months to negate the effectiveness of any such machines.
What You Will Need
The Grin Coin network is both GPU and CPU mineable. However, it is better suited for GPU mining; thus, you will need to purchase graphics cards to employ during the process. Nvidia cards are thought to be most effective for Grin Coin but some AMD models will be effective as well.
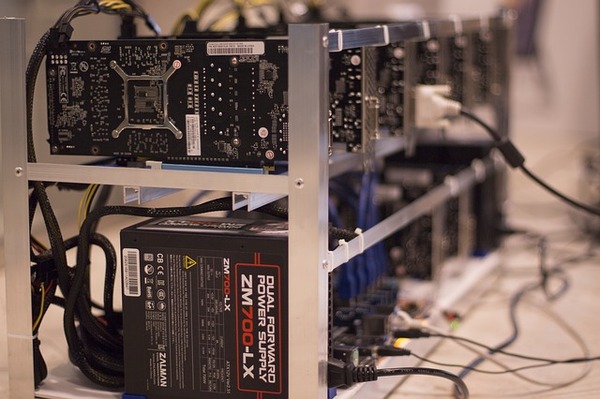 For Nvidia cards, look out for the 1070, 1070ti, 1080, 1080ti, 2070, 2080, and 2080ti models. Under the AMD brand, the cards 570, 580, Vega56, and lastly Vega64 are best suited. You must have a minimum of 5.5 GB to mine Grin Coin. If you choose to implement the more powerful ASIC program, you will need a minimum of 11 GB.
You will also need software. Obviously, you must download the drivers for your cards. There is also other additional software to acquire. For instance, an important tool is the MSI Afterburner. This software is designed to monitor power levels and the temperature produced during the mining process. Effectively regulating power and temperature is imperative to ensuring efficient use of the graphics cards, thus prolonging their shelf life as well as maximizing your profits.
You must also download mining software. While there aren’t many options due to the age of the coin, one of the most used ones is the GrinMiner software. It is important to note that the software comes with a two percent dev fee. To use GrinMiner, install the version of the software that is compatible with the OS on your computer. Grin Miner is compatible with GPU mining on Linux, Windows, and iOS.
Setting Up A Node And Wallet
Before you can begin mining on the Grin Coin network, you must first join the network and be running a node connected to a wallet. The Grin Coin network is currently only available for Linux and Mac. While it is not possible to run a node directly through a Windows device, you can set up a virtual machine on your Windows device.
Once downloaded, the file will run and you will see a page that looks like this:

Grin Floonet is a testnet. Choose to run the mainnet implementation Grin. After this, the node will automatically sync to the network. You have now set up your Grin Coin node and must now set up your wallet.
Open the file directory and run the file ‘grin wallet init’. This will initialize your wallet and create your master seed. You will be asked to input a password which you will use upon each login. It will also be used to encrypt your master seed.

Once you have received your master seed, store it safely as anyone with access to it has access to your funds. The wallet is designed to automatically connect to the node running on your machine. Should you wish to change this, you can access and edit the API server address. Once connected to your node, the wallet is running.
To check your balance, run the ‘info’ command. It will return a page that looks like this. You can always use this command to see how your mining operation is going.

Mining On Mac and Linux
For this article, we will use the grin miner software which is the official miner provided by project devs. To begin the process, access the grin-miner.toml file inside the main directory of the downloaded GrinMiner software. Prior to this though, you must provide your node with permission to mine on the network.
The mining server is called the stratum server. Once turned on, the node can mine on the network.

Simultaneously run the grin wallet listener command while launching your node from another terminal in order to finalize the process. Once this is done, launch the main configuration file. Here you will need to Edit the default values presented in the MINING CLIENT CONFIGURATION interface of the program. Input your email address in the place of the default “[email protected]” on the interface. It is recommended to add values prior to your email address in order to maximize privacy, such as in [email protected]. You will still receive emails at your normal address.

In the picture above, the stratum server is set to a Grinmint address. Grin mint is a Grin Coin mining pool. This is also why there is a stratum server login. If you are utilizing a mining pool, your stratum server address and login details must reflect that of the pools.
Once this is done, save and close. You must now configure the software to the Cuckaroo POW which is the GPU mineable version of the Grin Coin network. Edit the configuration by adding a hashtag to each section and replace it. Once done the Grinminer CPU plugin configuration should look like this.

Do this for every NVIDIA graphics card you have, changing the device number for each card. For AMD cards, edit the miner plugin configuration in the manner seen below. Again, do this for every AMD graphics card you are using to mine.

Once your miner is configured to work in tandem with your cards, your node is running with your wallet connected, run the mining program. As seen in the picture below, run the Grinminer file from the installation directory. You will see a page showing you the statistics of the cards running the miner.
Congratulations, you are now mining Grin Coin!

Screenshots from:
https://github.com/mimblewimble/docs/wiki/how-to-run-a-grin-node
https://github.com/mimblewimble/docs/wiki/how-to-use-the-grin-wallet
https://github.com/mimblewimble/docs/wiki/how-to-mine-grin
https://blog.blockcypher.com/mining-grin-on-grinmint-a-step-by-step-tutorial-98235c038876
Related Articles:
If you want to learn more about mining, staking, trading or investing in digital currencies, subscribe to the Bitcoin Market Journal newsletter today.
