
With the mailman gone and your front door locked, you turn around to face the nondescript brown cardboard box on your kitchen countertop. It houses your personal gateway to the heart of the bitcoin mining industry: your new Antminer S9i. What do you do now?
- Hook your S9i up to your router and your power supply unit (PSU).
- Connect the latter to an outlet (220v or 110v – see below for details)
- Grab the IP of your S9i
- Access your Antminer’s web interface
- Set your mining pool
- Mine bitcoin
You want to set it up as soon as possible. The smaller and even less impressive-looking box next to your S9i, the one containing your APW3++ power supply unit, means that you have all it takes to accomplish just that.

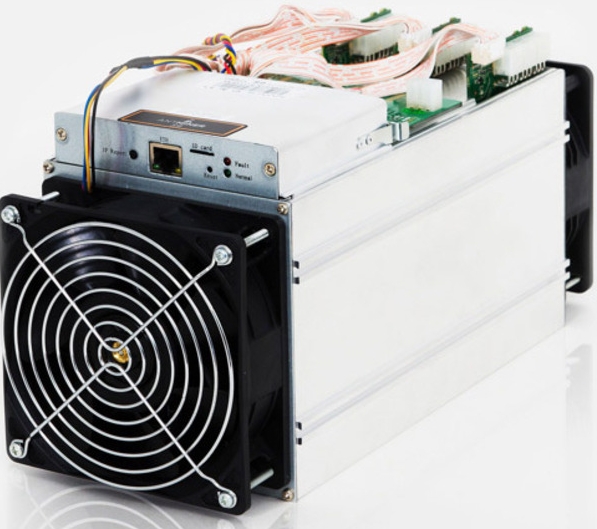
Hardware Connections
You need to connect your Antminer S9i bitcoin miner to your power supply unit and to your router.
- Your APW3++ has 10 PCI power connectors. You will need them all. Each of the three hashing boards of your S9 requires 3 such connectors. That’s 3X3=9. The tenth plugs into the control board of the S9. All these connectors are highly visible. Connect them in no specific order.
- The APW3++ works best with a 220v outlet. With a 110v circuit, you will have to use an EVGA 1600 power supply.
- Use a standard Ethernet cable to connect your S9 to your router. There’s an Ethernet connector on the front of your S9. It is the only one so you cannot mix it up. Plug the other end into one of the LAN connectors of your router.
- Use a standard 3-pin PC power cable to connect your APW3++ or EVGA supply unit to the outlet. As soon as you do that, your S3 will fire up. Your S3 behaves like another PC or router/switch on your network.
Software Setup
The S9 comes with an easy-to-use web interface. To access it, you need to identify the IP of your Antminer.
- Log into your router and take a look at its list of connected devices. You can also use a free network scanning tool, such as IPReporter (but any other will do). If you cannot get an IP reading, press the “IP Report” button located next to the Ethernet connector of your S9.
- Once you have the IP (its format is 192.168.xx.xx), type it into the URL field of your browser (where you normally type the web addresses you want to access). The S9 will prompt you for a user name/password. Use root/root – the default user name/password of all S9 miners.
- The web interface presents you with 4 tabs: System, Miner Configuration, Miner Status, Network.
- Click Miner Configuration and enter your Pool URL, Worker name, and password. (Where do you get this information? Go to a mining pool, such as Bitcoin.com and create an account there. Log into your account and check on the right, under “Start Mining”. Your user name is your worker name, and the stratum URL (BTC) is your mining URL. Your password can be anything, as long as it is not blank. You can configure up to 3 such mining pools. If the first one fails, the miner jumps into the second one, and so on.)
- Click “Save and Apply” in the bottom right corner. Check the Miner Status tab to see how your S9 hashes away!
Why would you opt for the S9 though? With the brand new S17 out, the venerable S9 still has its place on mining racks. Its price per TH (terahash) is better than that of the S17. If you have access to cheap electricity, it is still a great option, though the S17 is more efficient consumption-wise.
Please note that mining profitability depends upon many factors, like the ultra-volatile bitcoin price.
For more step-by-step guides on bitcoin mining, subscribe to the Bitcoin Market Journal newsletter now!
